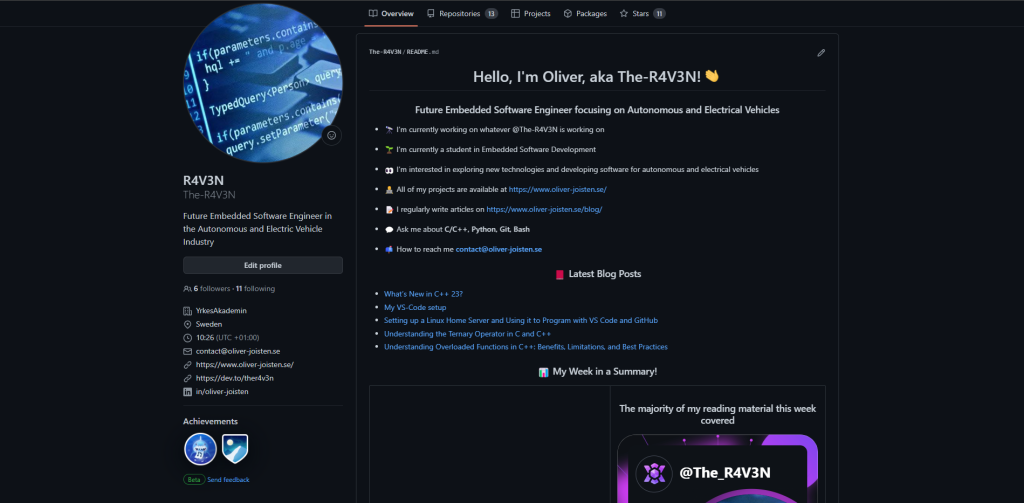
If you visit my profile on GitHub, you’ll notice that it contains images, social network links, some GitHub statistics and links to my blogs, which makes the GitHub profile stand out. This is possible through the GitHub profile README feature. In this article, we’ll learn how to create a GitHub profile README.
We’ll cover the following:
- what a GitHub profile README is
- how to create a GitHub profile README
- adding social badges, skills and descriptions about oneself
- adding your daily.dev card and the corresponding workflow
- adding GitHub stats
- creating a GitHub workflow to pull latest published blogs
To follow along with the tutorial, you’ll need to have a basic understanding of HTML and Markdown. If you’d like an introduction to Markdown, check out this Markdown introduction. Also, you should have a GitHub account. If you don’t have one yet, sign up at GitHub.
What a GitHub Profile README Actually Is
A GitHub profile README is a feature of GitHub that allows users to use a Markdown file named README to write details about themselves such as their skills, interests, GitHub stats and showcase it to the GitHub community. It’s shown at the top of your GitHub home page, above the pinned repositories. This is a fancy way to showcase one’s skills and stats on GitHub.
Pictured below is the final look of the GitHub profile that we’ll create for this article.
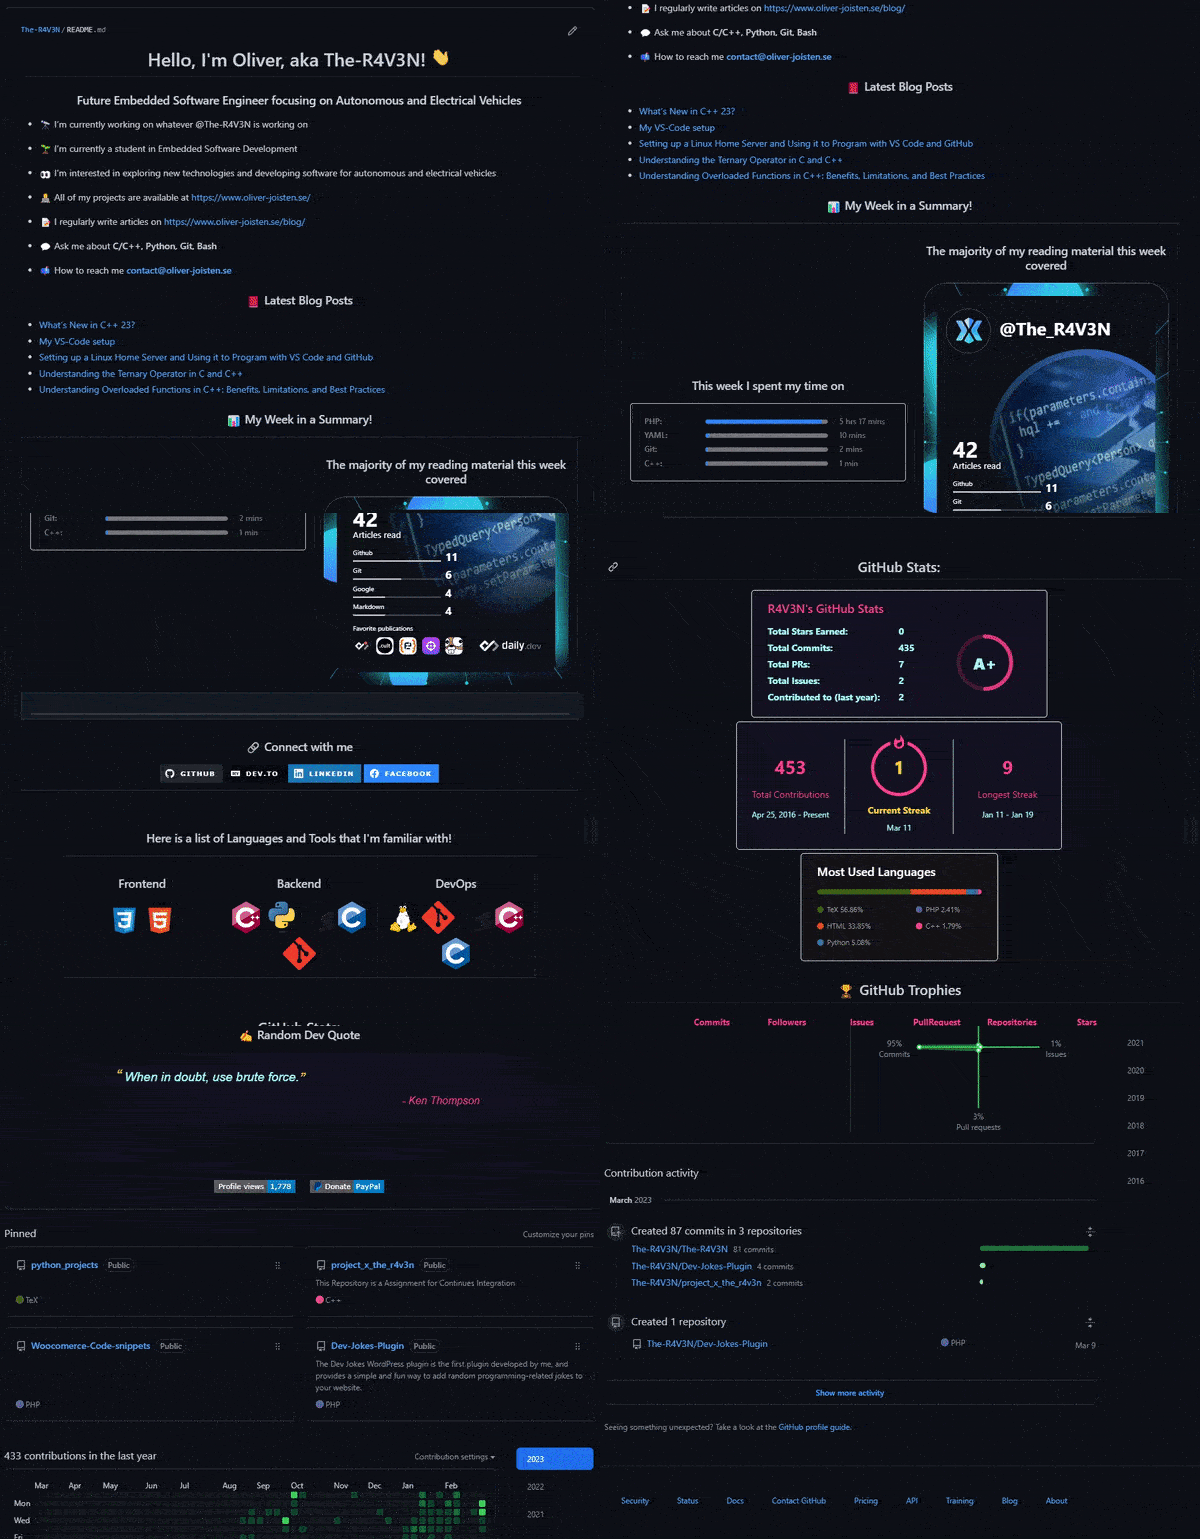
We’ll divide this into multiple sections and add contents for each section incrementally. The background color will change based on the GitHub theme settings of the user.
In the next section, we’ll look at the steps for creating the README file.
Creating a GitHub Profile README
The README file resides in a GitHub repository, the name of which is the same as the username of your GitHub account. To create the repository, follow these steps:
- Log in to GitHub.
- Click on + icon at top right of the page and select New Repository.
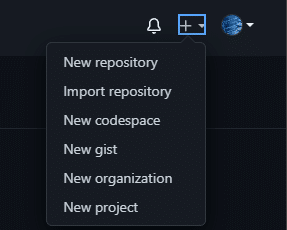
3. A Create a new repository page opens. In the Repository name field, enter the username of your GitHub account. After entering the username, GitHub displays a message describing that you’re about to create a GitHub special repository.

4. Check the Public checkbox under repository type to make the GitHub profile README visible to everyone who visits the GitHub profile page. If you don’t want users to see your GitHub profile README while it’s still in development, you can choose Private. Once you’re done with the complete development of your README, make sure to change the visibility to Public.
5. Check the Add a README file checkbox. This will add a README.md file where we’ll add the profile contents. The field values should look similar to the picture below.
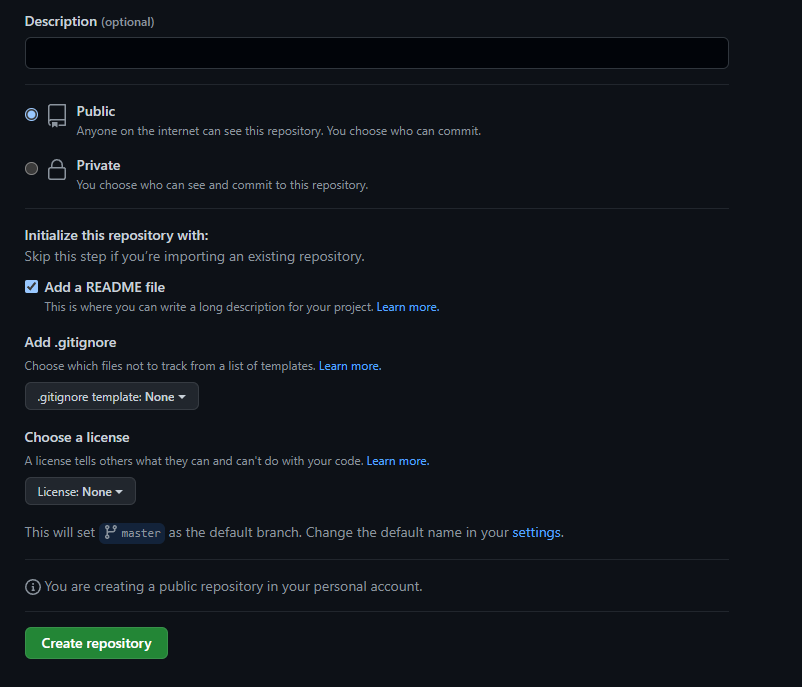
6. Click on the Create repository button. A special repository is created successfully. Go to the repository you just created and you’ll see a README.md file added to the repository.

In the next few sections, we’ll add contents to our README.md file. We’ll use GitHub’s file editor to write and preview the changes. You can use any other text editor you’re comfortable with.
To use the GitHub file editor, open README.md and click on the Edit this file icon (a pencil icon) on the top right of the page. You can read more about editing GitHub files at the official GitHub documentation on editing files.
Adding GIFs and about text to Your GitHub Profile README
Here’s an image of the content that will be added in this section:
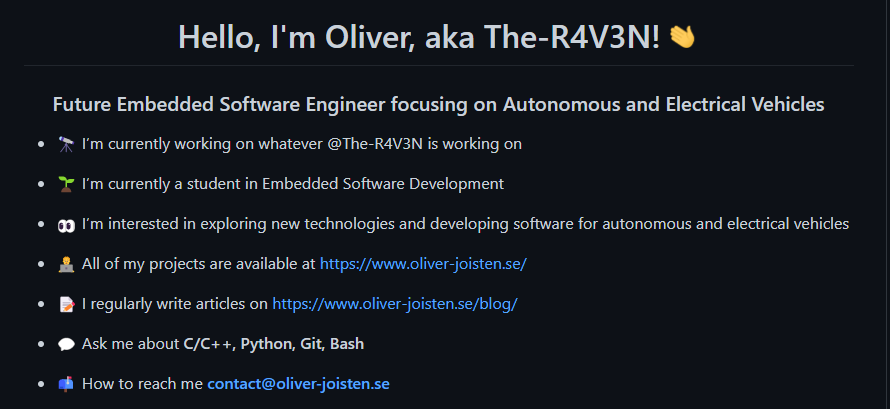
The GIF used in this section can be found here.
Following the Markdown as it is in my profile just change the name and all the other things you want.
<h1 align="center">Hello, I'm Your Name, aka Your Nikname! <img src="https://raw.githubusercontent.com/iampavangandhi/iampavangandhi/master/gifs/Hi.gif" width="30px"></h1>
<h3 align="center">Your profession come here</h3>
- 🔭 I’m currently working on
- 🌱 I’m currently
- 👀 I’m interested in
- 👨💻 All of my projects are available at [https://website](https://website.com)
- 📝 I regularly write articles on [https://website](https://website.com) if you have a blog :)
- 💬 Ask me about
- 📫 How to reach me your contact detailsNow go to the preview tab. Pictured below is the output we get something like this.

Adding Recent Blogs to Your GitHub Profile README
This section will show the recent blog posts published by a GitHub user at different blogging platforms. To achieve this, we’ll create a GitHub workflow, which is an automated process to execute jobs. Each job in a workflow will have one or more actions. A GitHub action is a set of executable commands combined into steps. We can either create our own GitHub action or use an action created by some other user.
To fetch the blog posts, we’ll use two already existing actions:
- Checkout: used to check out all the files in the current repository to a Git workspace where our workflow can access it.
- Blog Post Workflow: used to fetch recent blog posts published by a user on various websites.
The workflow can be run on a specific schedule or an event trigger. For this tutorial, we’ll execute the workflow every one hour, to fetch the recent blog post. You can read more about GitHub actions from the official documentation.
To configure the GitHub workflow, follow these steps:
Add the following code to your README.md. The workflow will replace the comment below with the list of published blog posts:
<!-- BLOG-POST-LIST:START -->
<!-- BLOG-POST-LIST:END -->- Save the changes by clicking on the Commit changes button.
- The configuration of GitHub workflow is defined in a
.ymlfile, which follows a YAML syntax. In your repository, in the Add File dropdown, select Create New file.

3. In Name your file.. field, enter .github/workflows/blog-post-workflow.yml. All GitHub workflow’s .yml configuration files reside under the .github/workflows directory.

4. Add the following code in the Edit new file tab:
name: Latest blog post workflow
on:
  schedule:
    # Runs every hour
    - cron: '0 * * * *'
  workflow_dispatch:

jobs:
  update-readme-with-blog:
    name: Update this repos README with latest blog posts
    runs-on: ubuntu-latest
    steps:
      - uses: actions/checkout@v2
      - uses: gautamkrishnar/blog-post-workflow@master
        with:
          max_post_count: "4"
          feed_list: "https://dev.to/feed/ther4v3n"
In the above code, we’ve defined a workflow with name as “Latest blog post workflow”, which runs on a schedule mentioned in the cron field. 0 * * * * is a POSIX cron syntax, meaning that the schedule is to run at the 0th minute every hour.
workflow_dispatch: allows the user to trigger the workflow manually. jobs let us define one or more jobs that will run when the workflow is executed. In our case, we have one job — that is, update-readme-with-blog — which runs-on an Ubuntu environment machine hosted by GitHub.
steps define a set of actions or commands to be executed. We’ve defined two actions under steps: actions/checkout@v2 and gautamkrishnar/blog-post-workflow@master. The latter takes two input parameters defined under the with field. max_post_count defines the maximum number of posts to show in the README, feed_list is a comma-separated RSS feed of URLs for different blogging platforms.
In this tutorial, we’ve fetched blogs from the dev.to platform. For the list of all supported platforms, check this documentation.
To learn more about GitHub workflow syntax, check out this Workflow Syntax documentation.
Replace the feed_list with your RSS feed URLs and click on the Commit new file button. This will successfully create the workflow. It will fetch new blog posts from dev.to and add them to your README.md file every hour.
To trigger the workflow manually, follow these steps:
- In your repository, go to the Actions tab.
- Under All workflows, click on Latest blog post workflow.
- In the Run workflow dropdown, click on the Run workflow button. The workflow will start executing.

4. Go to your GitHub profile page, and under the “Blog Posts” section you’ll see a list of all the blog posts from the blogging platforms defined in the blog-post-workflow.yml file
Adding wakatime and your DevCard to the README
To get wakatime to your README you need a Wakatime account. Sett it up and make it public. You also need to install the Wakatime extention into your favorite IDE
I have set it up in a table together with my devcard so that it looks more appealing. Now copy this code for the heading and the wakatime and place it into your README.
<div align="center">
          <h3>This week I spent my time on</h3>
          <img src="https://github-readme-stats-taupe-two.vercel.app/api/wakatime?username=Your_NAME&hide_title=true&hide_border=false&langs_count=5&bg_color=00000000&text_color=777" />
        </div>
Change the username to your wakatime name. You wont see anything right now. Because it has a delay of 1 day. Means when you write code today it will show up tomorrow in your README.
Adding the daily DevCard to your GitHub profile
Manually adding the DevCard to your GitHub profile
The easiest way to add your DevCard to your profile is by visiting the DevCard page and generating your card.
You can then go ahead and copy the code on the right by clicking the copy button.
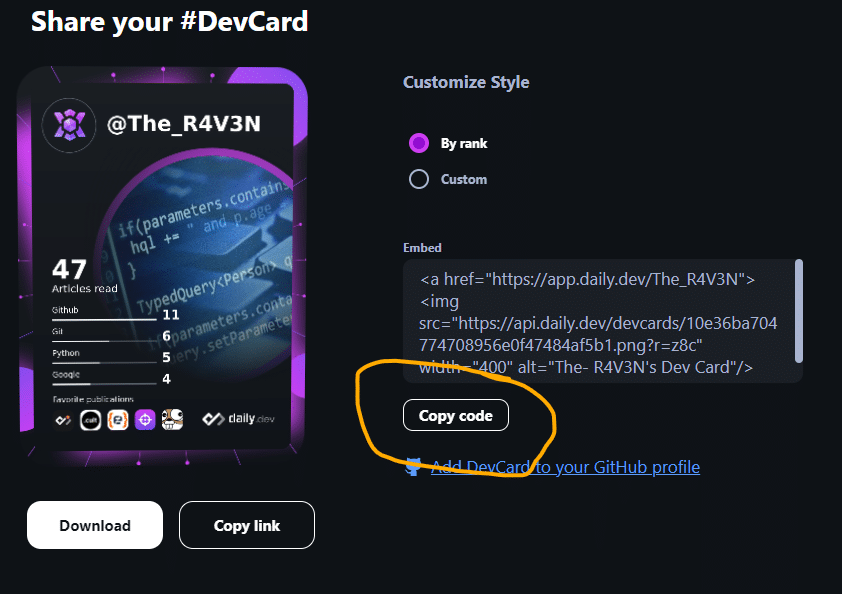
Head back over to your GitHub profile README.md file and paste the code.
It looks something like this:
<a href="https://app.daily.dev/The_R4V3N"><img src="https://api.daily.dev/devcards/10e36ba704774708956e0f47484af5b1.png?r=z8c" width="400" alt="The- R4V3N's Dev Card"/></a>If you save this file and view your profile, you should now see the DevCard in action.
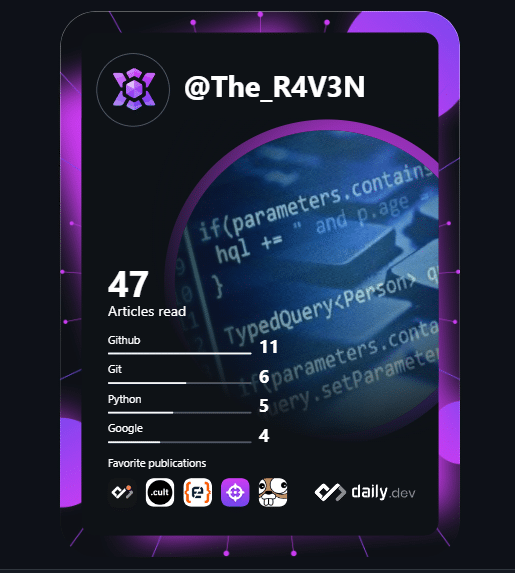
Pretty cool, right. However, there is one downside to this approach.
The DevCard is cached, so it won’t automatically update the content inside it 😢.
However, don’t worry. That’s where the GitHub Action comes in.
Using a GitHub action to update your DevCard automatically
Ole-Martin decided to make this amazing GitHub action for us!
What it does is it will automatically get your own DevCard and download it to your profile repository.
This means we can automatically run this action every x time and get the latest DevCard.
Let’s see how we can use it for our profile.
Click on the Actions button for your profile repository and set up a new workflow yourself.

From there, it will create a basic workflow that we’ll start modifying.
Change the name of the workflow to ‘DevCard’.
Then we want to set two ways our action should be triggered, the first being if there is a push on the master branch.
The other one is a schedule, which acts as a cronjob and will return every {x} time.
In our case, we will run it every night at 00:00.
*Also note how we set write permissions.
permissions:
  contents: write

on:
  workflow_dispatch:
  push:
    branches:
      - main
  schedule:
    - cron: "0 0 * * *"
The workflow_dispatch tells the action it can manually run from the Actions tab.
Then we want to create a new job that will run the DevCard GitHub action.
We need to set one variable for our version, which will be the ID of the DevCard we are fetching.
jobs:
  devcard:
    runs-on: ubuntu-latest
    steps:
      - name: devcard
        uses: dailydotdev/action-devcard@2.0.4
        with:
          devcard_id: ${{ secrets.DEVCARD_ID }}
The total file look like this:
name: DevCard

permissions:
  contents: write

on:
  workflow_dispatch:
  push:
    branches:
      - main
  schedule:
    - cron: "0 0 * * *"

jobs:
  devcard:
    runs-on: ubuntu-latest
    steps:
      - name: devcard
        uses: dailydotdev/action-devcard@2.0.2
        with:
          devcard_id: ${{ secrets.DEVCARD_ID }}
The next thing we need to do is fetch our DevCard ID and set it as a secret in this GitHub repository.
Head over to the DevCard page and generate your DevCard.
The ID we need is the part before the .png part.
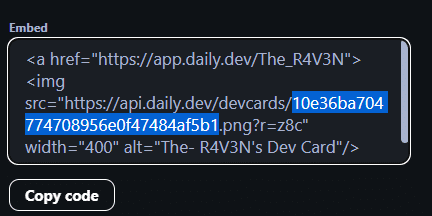
So in the above example, the URL looks like this:
https://app.daily.dev/devcards/10e36ba704774708956e0f4748af5b1.png?r=z8cWhich means our ID is 10e36ba704774708956e0f4748af5b1.
Now we can head back to GitHub and click the Settings tab.
From there, choose the Secret section and generate a new secret.
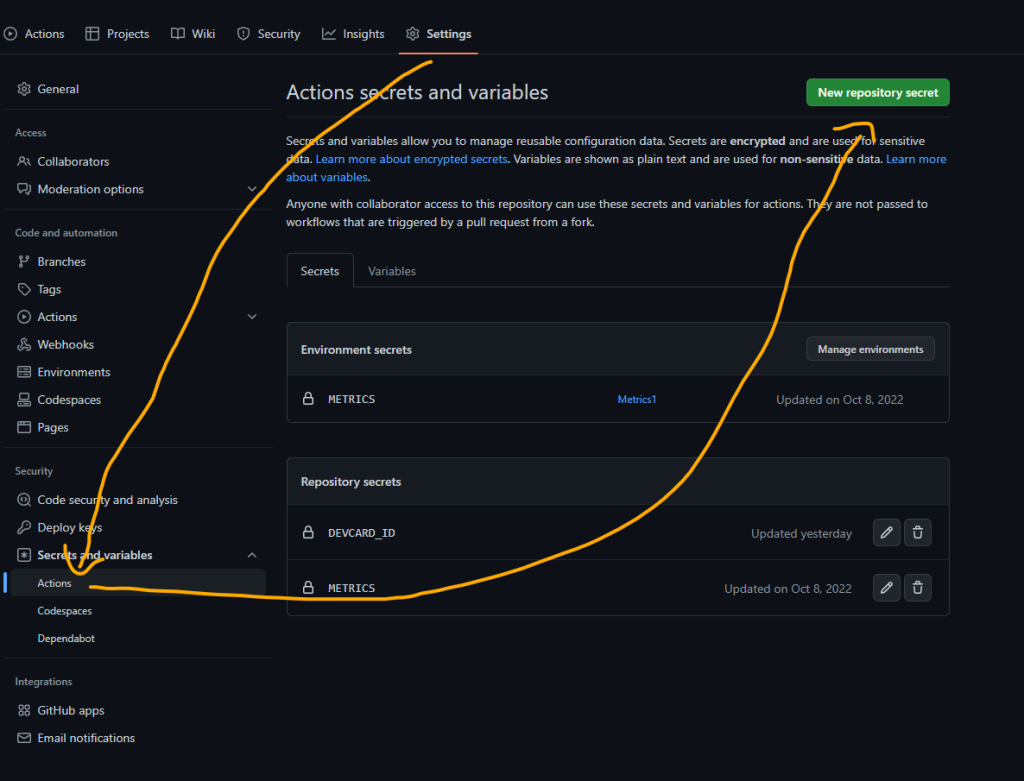
This secret should have the following name: DEVCARD_ID and the value we just retrieved from the image.
Now we can head over to the Actions tab and run our workflow.
Once the workflow is done, you should see a green icon on your workflow.

Head back to your repository, and suddenly you will see there is a new file called devcard.svg.
All we have to do now is update our README.md file to use this generated file like so:
<a href="https://app.daily.dev/DailyDevTips"><img src="https://github.com/The-R4V3N/The-R4V3N/blob/master/devcard.svg" width="400" alt="The- R4V3N's Dev Card"/></a>
Where you have to modify the href, The-R4V3N/The-R4V3N, and alt parts to be your repository name.
And there you go! You now have an automatically updating DevCard on your GitHub profile.
Keep your GitHub action up-to-date with GitHub Dependabot
If you opted for the GitHub action method, you might consider using Dependabot for this repo. It will make sure you are always using the latest version of our GitHub action. To enable Dependabot for this repository, all you need to do is add a .github/dependabot.yml file with the following contents.
version: 2
updates:
  # Maintain dependencies for GitHub Actions
  - package-ecosystem: "github-actions"
    directory: "/"
    schedule:
      interval: "daily"
Adding social icons and a list of tools to your README
To make it easy i used a Github readme generator
Choose what you want to have in your README generate the Markdown copy it and place it next under everything you already have. Now you can style it as you wish.
Conclusion
In this tutorial, we’ve learned what a GitHub profile README is and how to:
- create a GitHub profile README
- add GIFs, descriptions, skills
- add GitHub Streak Stats and GitHub Readme Stats
- create a GitHub workflow to fetch the latest published blog posts
I hope this tutorial inspires you to create an amazing GitHub profile README. Also, you can go through these open-source projects that’ll let you add some more cool features to your GitHub profile README:
- Display weekly Dev metrics
- Display Spotify recently played song card
- Show a new programming joke every day

